< Previous | Contents (GEM) | Contents (DOS+) | Next >
2 STARTING TO USE GEM
2.1 Introduction
This section introduces the procedures and techniques common to all the GEM applications, using the Desktop to demonstrate these and provide examples.
After reading this section, you will be familiar with the general techniques and can go on to use Paint, Write or Desktop. It may be better to use Write or Paint first, turning to Desktop after creating some documents or paintings to learn how to copy and move them. The advantage of using Paint or Write first is that if you are moving 'real' documents rather than empty ones, you can open them to check that the operation has been successful.
Many of the operations and concepts in this section are introduced with an example; follow the instructions to test the procedures or see an example.
WARNING:
Always work on copies of the GEM discs. If you have not made copies, or have lost them, turn to the Set-up Guide in the Appendix for instructions (7.5). DO NOT USE THE MASTER COPIES to run GEM.
2.2 How to Start GEM
If the microcomputer has not been prepared for GEM, read the Set-up Guide. If you have used GEM before, or have completed the procedures described in the Set-up Guide, follow whichever series of instructions below is appropriate. For a system with floppy discs, follow the first series (2.2.1); for a system with a hard disc, follow the second series (2.2.2).
2.2.1 Floppy Disc System
Turn on the machine and monitor, and ensure that the disc drive and mouse are connected.
If the disc drive operates immediately and the word TUBE appears in the top line of the message on the screen, insert the Boot disc into the first drive (A: or 0:) and close the drive door.
If the disc drive does not operate immediately and the word TUBE is not present, type
*CONFIGURE TUBE
and press the RETURN key, then press the CTRL and BREAK keys simultaneously. When the drive begins to operate, insert the Boot disc and close the drive door.
A message similar to
Boot strap loader
Loading DOS Plus..
reports that DOS is being loaded. When the prompt
A>
appears, remove the Boot disc and insert the Program disc in the first drive. Either press the red function key f0 or type
GEM RETURN
(Close the door when the drive begins to operate.) This loads and runs the GEM software.
2.2.2 Hard Disc System
Turn on the machine, monitor and hard disc drive and ensure that the mouse is connected.
After a short time, the message
Boot strap loader...
may appear. If it does not, type
*CONFIGURE TUBE
and press the RETURN key, then press the CTRL and BREAK keys simultaneously. The Boot strap message will appear when the command has been successfully completed.
Press the RETURN key to load DOS plus, the operating system. When the operating system has been loaded, the prompt
C>
will appear. Either press the red function key f0 or type
GEM RETURN
to load and run the GEM software.
2.3 The Desktop Screen
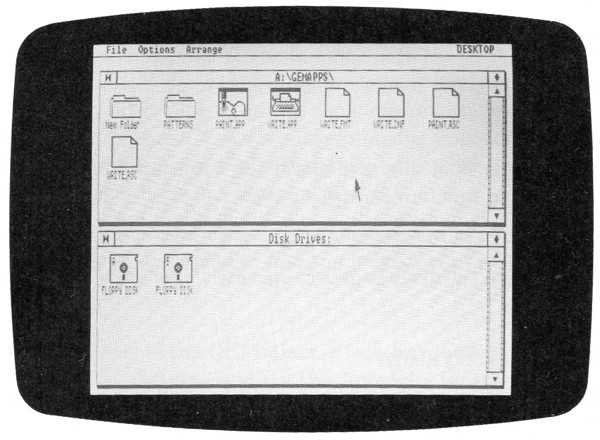
The image which appears on the screen when you first enter GEM is called the GEM DESKTOP. All administrative procedures – copying and moving documents, etc. – are carried out from the Desktop. The picture below illustrates the image which should appear when you first start GEM.
 |
2.4 Using the Mouse
The principle means of communicating with GEM is by moving the mouse and CLICKING on items on the screen.
The mouse must be plugged into the User Port socket on the base of the microcomputer. Consult the Set-up Guide, 7.2, if the mouse is not connected. Place the mouse on a flat surface with the flex away from you and move it around. The rubber ball (visible from underneath the mouse) enables it to move freely. Moving the mouse causes a corresponding movement of an arrow – the POINTER – over the screen. If the pointer does not move, check that the mouse is properly connected.
The lefthand button on the front of the mouse is used for clicking, the means of selecting items. The clicking techniques are considered next.
2.5 Clicking Techniques
The concepts of icons, menus and using the pointer on the screen were briefly introduced in 1.3. In order to use the icons and menus, it is necessary to be familiar with the four different clicking techniques. These are referred to throughout this manual as
click
double-click
shift-click and
drag.
They are executed as follows – do not try them immediately.
To CLICK on an item, position the pointer over it and press the button on the mouse once.
To DOUBLE-CLICK on an item, position the pointer over it and press the button on the mouse twice in rapid succession.
To SHIFT-CLICK on an item, position the pointer over it and hold down the SHIFT key on the keyboard, or the righthand button on the mouse, while you click on the item using the lefthand button on the mouse.
To DRAG an icon, position the pointer over it and press and hold down the lefthand button on the mouse. Then move the mouse, keeping the button pressed down, until the outline of the icon moves to the position you want it to be in, then release the mouse button.
You may use a mouse you already have, or that supplied. If the mouse has three buttons, the centre button duplicates the function of the lefthand button.
2.6 Folders and Documents
Folders and documents are part of the filing system provided by GEM Desktop. They mimic an ordinary office filing system.
GEM stores the text and paintings you create as DOCUMENTS. Each created item is a separate document, and has a different name. The name includes a suffix, .DOC or .IMG, indicating whether it is a text DOCument or a graphic IMaGe created with Paint. GEM also creates additional documents with different suffixes for the use of the program. These will be considered later, when they are relevant. They appear on the Desktop, but cannot be accessed and used like Paint and Write documents.
Documents are stored in FOLDERS. These are analogous to conventional folders; a folder is used to store documents, and does not itself have any text or graphics belonging to it – a folder without any documents holds no information. Folders may be stored one inside another to form a filing system. This allows documents to be kept in an order which reflects their contents, subject material, or purpose. For example, you might wish to store all memoranda together, and all letters together. You could subdivide the letters into personal and business correspondence. A suitable structure of documents would be:
 |
The full name of a document includes the names of the folders in which it is stored, and also a letter indicating the disc drive in which the disc holding the folder is located. This is the DIRECTORY PATH, and is considered in detail in Section 5 (see 5.2).
A list of the contents of a folder is called a DIRECTORY. A directory may be displayed on the Desktop, or listed in an ITEM SELECTOR (described in 2.12) when you need to choose a document.
2.7 Windows
The part of the screen which is occupied by the picture – the Desktop, word-processing or painting area – is called the WINDOW. It is possible to alter the size of the window, and sometimes to view more than one window at a time, to alter the position of the window or to superimpose one window on another. Some commands cause an additional window to be superimposed over the drawing or writing window – these will be considered later.
The Desktop screen is divided into two windows. The upper window shows some of the folders and documents stored on one of the discs. The lower window shows the floppy and/or hard disc icons.
The Desktop windows share certain features with the other windows in GEM.
The MENU BAR is the strip along the top of the screen which displays the names of the menus: File, Arrange, Options and DESKTOP. The TITLE BAR reports the name of the folder which is currently open.
In the top righthand corner of each of the windows is a diamond shaped box. This is the FULL SIZE BOX; clicking in this box will alter the size of the window from half screen to full screen, or from full screen to half screen. Try clicking in the full size box of one of the windows. Click again to return both windows to the screen.
In the upper lefthand corner of each window is a 'butterfly' symbol. This is the CLOSE BOX; clicking in this box will close the folder and return the window which is one 'level' higher. On starting GEM, the upper window shows the contents of the GEMAPPS folder, displaying the applications icons. Click on the close box to close GEMAPPS; the window will be replaced by another window, displaying GEMAPPS as a folder. Clicking on the close box in the lower window will have no effect as the discs displayed are the top level of storage.
There is a vertical strip down the righthand side of each window. When you start using GEM, this strip will be clear, but when you use a document or directory which is too large to be displayed in its entirety, the clear area will occupy only part of the strip and any part above or below it will be shaded. The clear area is the SLIDER; the shaded areas are the SCROLL BARS. The position of the slider indicates the location within the whole directory or document of the part which is currently visible. When the beginning of the document or directory is on the screen, the slider is at the top of the strip. The size of the scroll bar beneath it indicates how much of the document or directory is not visible, as the relative sizes of the slider and scroll bars are directly proportional to the volume of the document or directory visible and not visible at any time. To move to a different area of the document or directory, drag the slider up or down. Alternatively, click on the scroll bars or the arrows at their ends to move through the document by increments. Clicking on the scroll bars moves through the document more quickly than clicking on the arrows.
2.8 Icons
An ICON is a picture representing an item on the Desktop – a floppy or hard disc, folder, document or application.
The icons displayed in the lower window represent two floppy discs and a hard disc. The floppy discs are referred to as A and B; the letter indicates which drive the disc is in (A: or B:). The hard disc is referred to as C.
The icons displayed in the upper window show folders and documents. If you clicked on the close box, one of the folders displayed will be named "GEMAPPS"; it contains the GEM applications Write and Paint. When you have created some documents, the icons representing them will illustrate whether they are text or graphics documents.
Using just the pointer and icons it is possible to SELECT an item, to OPEN or use it, or to copy it.
An item is selected by clicking on its icon. Once you have selected it, you can do something with it – for example, choosing a command from a menu which will then operate on the selected icon. To DE-SELECT an item without using it, simply click on an empty part of the screen.
An icon is selected and opened by double-clicking on it, or by selecting it and then using the menu command, or by clicking on it and then using the RETURN key on the keyboard.
To move or copy the contents of a disc, folder or document, drag the appropriate icon to its new destination. This is primarily a Desktop technique, and will be considered in more detail later (5.4).
2.9 Opening an Application or Folder
To use an application or examine the contents of a folder it is necessary to OPEN it. Opening a folder replaces the window in which the folder appeared with one showing the contents of the folder. Opening an application loads and runs that application. Opening a disc displays the top-level folders held on that disc.
A disc, application or folder can be opened by double-clicking on the appropriate icon, or by selecting the icon and then clicking against the Open command in the File menu (see 2.10). Try opening GEMAPPS by double-clicking on its icon. The window is replaced by that displayed when you entered GEM, showing the contents of GEMAPPS. Now the icons include the GEM Paint folder – which shows a picture of a palette – and the GEM Write folder – which shows a picture of a typewriter. If you double-click on either of these, the application will be opened and will replace the Desktop. Click on the close box (the butterfly symbol in the upper lefthand corner) to close the folder again.
2.10 Menu Commands
The menus used by GEM are called DROP-DOWN menus because they drop down from a bar across the top of the screen (the MENU BAR). Moving the pointer into the menu bar and over the name of a menu causes that menu to be displayed. When a new menu is called up, the last one is removed from the screen. To remove a menu from the screen without selecting a command, click anywhere else on the screen.
To use one of the menu commands, click on the appropriate line of the menu. For example, click on the clock option in the DESKTOP menu (on the righthand side), and the clock accessory will appear on the Desktop. To remove the clock, click on its close box.
Some of the menu commands require that an icon or a group of icons is selected before the command can be used. These lines appear in faint type when no icons are selected, indicating that they cannot be used. If you click on one of these lines, the command will be ignored and the menu will disappear. To test this, display the File menu and click on the command. Now select the GEMAPPS icon and display the File menu again; this time, the command is visible. If you click on , the initial window showing the contents of GEMAPPS will be restored.
The only menu commands which you will need to use at this stage are:
in the File menu
in the File menu.
Exit to DOS leaves the GEM software suite and returns to DOS, the Operating System. Type GEM or press f0 to re-enter GEM and restore the Desktop. (Type NOTUBE and press the RETURN key to return to the BBC Master Series, bypassing the Tube.)
You may wish to use the desk accessories; these are opened from the Desk menu, and are discussed in 2.13.
The other menu commands are concerned with Desktop procedures, and are discussed in Section 5.
2.11 Dialogues
Many of the menu commands in the GEM applications, and some other operations, require that you make a choice between two or more options. The options are offered in the form of a DIALOGUE. A dialogue is a rectangular box superimposed over the picture on the screen; it has a series of boxes, each displaying a possible choice, sometimes a line for text, and boxes labelled and . To make a selection, type any necessary text and click on the appropriate box or boxes.
The most simple form of dialogue offers only the and boxes, asking you to confirm a command or to abandon it. Other dialogues offer several choices, or allow you to set several options at once. The boxes showing the current settings are highlighted; to change the settings, click on the required options and then either click on or press the RETURN key on the keyboard. Pressing the RETURN key is equivalent to clicking on in any dialogue. To reject the new settings, click on and the original settings will be retained.
A second type of dialogue has a TEXT FIELD so that you can type in text (the name of a folder or document, for example).
To display a dialogue of each type follow these instructions:
| a. | Click on the Set Preferences command in the Options menu; the following dialogue is displayed: |
||||||||||||||||||||||||||||||||||||||||||||||||||||||||||||||||||
|
|||||||||||||||||||||||||||||||||||||||||||||||||||||||||||||||||||
| The highlighted options are those currently set. Click on . |
|||||||||||||||||||||||||||||||||||||||||||||||||||||||||||||||||||
| b. | Double-click on the icon; the following dialogue is displayed: |
||||||||||||||||||||||||||||||||||||||||||||||||||||||||||||||||||
NEW FOLDER Name: |________.___
|
|||||||||||||||||||||||||||||||||||||||||||||||||||||||||||||||||||
Type a name up to eight characters long (using the DELETE key if necessary), and press RETURN or click on to create the folder. Click on to abandon the command.
Sometimes GEM issues messages providing information. This occurs if you request something which is impossible, or sometimes if you make a mistake.
The message is a type of dialogue. It requires that you click on to confirm that you accept the message and its implications, or sometimes on to abandon an impossible command.
2.12 Item Selector
The ITEM SELECTOR is a box which appears superimposed over the window whenever you issue a command which requires a choice of folder or document to be made, or a name for a new document to be supplied.
The item selector is similar to a dialogue. It lists the names of documents and folders contained in the folder currently open. It has and boxes.
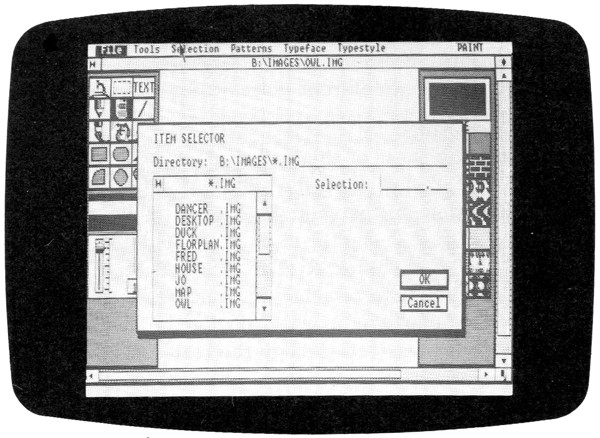
An example of an item selector is illustrated below. This example offers different documents available within Paint. The name currently selected appears in the text field. To select an item, click on the appropriate line; the name will be highlighted. To confirm your choice, click on the box. You can also select an item by double-clicking on it, or by typing its name in the text field (the letters will automatically appear in the line marked Selection:) and clicking on the box. Pressing the RETURN key has the same effect as clicking on the box.
The item selector has room to display only nine names, although it is possible to have many more documents than this within a folder. In such a case, only the first nine titles are displayed (they are arranged alphabetically). To select an item which is not displayed, use the slider and scroll bars to move through the list until the required name is visible, then click on it. Drag the slider up or down to display higher or lower sections of the list, or click on either the arrows or the scroll bars to move by increments through the list.
When you have created some documents and built up a directory path structure (explained in Section 5.2), you may want to select an item which is not listed in the item selector because it is not held in the folder which is currently open. In this case, move the pointer to the line showing the path name of the folder and click once, then type the directory path name and the title of the document, using the DELETE key if necessary. To clear the whole line, press the ESCAPE key. Alternatively, click on the close box of the item selector to move up the directory path until the relevant folder name is displayed. Click on this, and when the contents of this folder are listed, click on the appropriate folder or document name. Continue to move through the directory path until the document name is displayed, then select it in the usual way. The item selector only lists documents of the type indicated by the suffix in the directory path line. If the last part of the name is *.DOC, only .DOC documents in the open directory will be listed.
Clicking on the close box of the item selector shown on the next page would display the options
Clicking on would list folders and any documents suitable for use with Paint available in the DOCUMENTS folder. If you had not yet created any more folders or any graphics documents with the suffix .IMG in DOCUMENTS, the only available folder would be
Clicking on would display any documents with the suffix .IMG in that folder; as the folder does not contain any .IMG documents, the directory would be empty.
2.13 Desk Accessories
The DESKTOP menu includes the options
.
These are DESK ACCESSORIES; these examples are equivalent to the accessories you might have on a real desk, and behave in the same way. The other accessories supplied as standard and offered in this menu are and the . These use documents, and will be considered later. (For details of the Snapshot, see 3.6.7; for details of the Print Spooler, see 4.6.7 or 6.6.4.) Additional accessories may be obtained and installed.
To make an accessory appear, click on the appropriate menu line. To remove an accessory, click on its close box. The accessories may be moved about the screen. To move an accessory, drag the title bar (the shaded bar along the top in which the name of the accessory appears) to the new position. To drag the title bar, move the pointer into the title bar, press down the mouse button and move the pointer. An outline rectangle moves with the pointer as a guide to the area the accessory will cover. Keep the button pressed until the outline is where you want it. When you release the mouse button, the accessory will appear at the new location.
2.13.1 The Calculator
Click on the command in the Desk menu. When the calculator appears, try dragging it to a different place on the Desktop.
Calculations are performed by clicking over the appropriate symbols and numbers, or by entering these at the keyboard, or a combination of both. The characters +, -, *, /, % are used for addition, subtraction, multiplication, division and calculation of percentages respectively. The 'change sign' operation represented by + \ – on the calculator is obtained from the keyboard by using the backslash ( \ ) character. The and functions (add to or subtract from the memory) can be achieved from the keyboard by typing M+ or M-. The numbers input appear in the calculator's 'display' area above the `buttons'. Click on or press = to display the result.
There are two 'Clear' buttons, and . clears the last entry but does not abort the current operation. For example, the sequence
is equivalent to
.
clears the display and terminates the current operation.
2.13.2 The Clock
The clock is a twelve-hour clock; am or pm is displayed to the right of the time.
Because the microcomputer has a 'real time' clock built into it, it should not be necessary to set the time on the clock. However, should you wish to set the time, the procedure is as follows: click on the clock symbol to the left of the display to enter the time-setting mode; click on the hours or minutes figure and then type in the number of hours or minutes as a two-digit number at the keyboard. Only two-digit numbers will be accepted (01 to 12 for the hours, 01 to 60 for the minutes). Click on to change its setting.
You can use Sections 3, 4 and 5 in any order. It may be best to turn first to either Section 3 or Section 4 to create some documents using Paint or Write.